作者:Adam Freeman
翻译:陈广
日期:2019-1-1
在本章中,我将构建 SportsStore 应用程序的面向客户部分,这将允许用户选择产品,查看他们的购物车,并结帐以创建订单。我在本章中添加的功能在很大程度上与 ASP.NET Core MVC 框架有关,并建立在前几章创建的 Entity Framework Core 基础之上。
我在本章中加快了步伐,因为大部分工作都是在前面章节中使用 Entity Framework Core 创建的基础之上使用 ASP.NET Core MVC 构建功能。
我继续使用在第4章中创建并在此后的章节中更新的 SportsStore 项目。
提示:您可以从本书的 GitHub 存储库下载本章的 SportsStore 项目和其他章节的项目:https://github.com/apress/pro-ef-core-2-for-asp.net-core-mvc。
在第8章,我测量了执行查询所需的时间。现在不再需要它了,我在清单9-1中将它们注释掉。
清单 9-1:Models/Pages 文件夹下的 PagedList.cs 文件,注释语句
using System.Collections.Generic;
using System.Linq;
using System;
using System.Linq.Expressions;
using System.Diagnostics;

namespace SportsStore.Models.Pages
{
    public class PagedList<T> : List<T>
    {
        public PagedList(IQueryable<T> query, QueryOptions options = null)
        {
            CurrentPage = options.CurrentPage;
            PageSize = options.PageSize;
            Options = options;
            if (options != null)
            {
                if (!string.IsNullOrEmpty(options.OrderPropertyName))
                {
                    query = Order(query, options.OrderPropertyName,
                        options.DescendingOrder);
                }
                if (!string.IsNullOrEmpty(options.SearchPropertyName)
                    && !string.IsNullOrEmpty(options.SearchTerm))
                {
                    query = Search(query, options.SearchPropertyName,
                        options.SearchTerm);
                }
            }

            //Stopwatch sw = Stopwatch.StartNew();
            //Console.Clear();

            TotalPages = query.Count() / PageSize;
            AddRange(query.Skip((CurrentPage - 1) * PageSize).Take(PageSize));

            //Console.WriteLine($"Query Time: {sw.ElapsedMilliseconds} ms");
        }

        // ...其它省略...
    }
}
在第8章,我在视图中使用了PagedList类,而没有更改视图模型,只是为了演示我可以在更改最少的情况下向应用程序添加扩展功能。本章我将直接在视图中使用PagedList类,因此我将包含的命名空间添加到视图导入文件中,如清单9-2所示。
清单 9-2:Views 文件夹下的 _ViewImports.cshtml 文件,添加命名空间
@using SportsStore.Models
@using SportsStore.Models.Pages
@addTagHelper *, Microsoft.AspNetCore.Mvc.TagHelpers
为面向客户的功能准备数据模型,我在Product类中添加了一个Description属性,以便客户能够了解他们看到的产品,如清单9-3所示。
清单 9-3:Models 文件夹下的 Products.cs 文件,添加属性
namespace SportsStore.Models
{
    public class Product
    {
        public long Id { get; set; }
        public string Name { get; set; }
        public string Description { get; set; }
        public decimal PurchasePrice { get; set; }
        public decimal RetailPrice { get; set; }
        public long CategoryId { get; set; }
        public Category Category { get; set; }
    }
}
为了便于按类别查询和存储数据,我在Category类中添加了一个导航属性,以便 Entity Framework Core 能够填充相关Product对象的,如清单9-4所示。
清单 9-4:Models 文件夹下的 Category.cs 文件,添加导航属性
using System.Collections.Generic;

namespace SportsStore.Models
{
    public class Category
    {
        public long Id { get; set; }
        public string Name { get; set; }
        public string Description { get; set; }

        public IEnumerable<Product> Products { get; set; }
    }
}
我希望能够在大量的测试数据和更真实的数据之间切换。为此,我将清单9-5所示的代码添加到 Seed 控制器中,以添加标准的运动商店类别和产品。
清单 9-5:Controllers 文件夹下的 SeedController.cs 文件,添加产品种子数据
using Microsoft.AspNetCore.Mvc;
using Microsoft.EntityFrameworkCore;
using SportsStore.Models;
using System.Linq;

namespace SportsStore.Controllers
{

    public class SeedController : Controller
    {
        private DataContext context;

        public SeedController(DataContext ctx) => context = ctx;

        public IActionResult Index()
        {
            ViewBag.Count = context.Products.Count();
            return View(context.Products
                .Include(p => p.Category).OrderBy(p => p.Id).Take(20));
        }

        // ...其它省略...

        [HttpPost]
        public IActionResult CreateProductionData()
        {
            ClearData();
            context.Categories.AddRange(new Category[] {
                new Category {
                    Name = "Watersports",
                    Description = "Make a splash",
                    Products = new Product[] {
                        new Product {
                            Name = "Kayak", Description = "A boat for one person",
                            PurchasePrice = 200, RetailPrice = 275
                        },
                        new Product {
                            Name = "Lifejacket",
                            Description = "Protective and fashionable",
                            PurchasePrice = 40, RetailPrice = 48.95m
                        },
                    }
                },
                new Category {
                Name = "Soccer",
                Description = "The World's Favorite Game",
                Products = new Product[] {
                        new Product {
                            Name = "Soccer Ball",
                            Description = "FIFA-approved size and weight",
                            PurchasePrice = 18, RetailPrice = 19.50m
                        },
                        new Product {
                            Name = "Corner Flags",
                            Description = "Give your playing field a professional touch",
                            PurchasePrice = 32.50m, RetailPrice = 34.95m
                        },
                        new Product {
                            Name = "Stadium",
                            Description = "Flat-packed 35,000-seat stadium",
                            PurchasePrice = 75000, RetailPrice = 79500
                        }
                    }
                },
                new Category {
                    Name = "Chess",
                    Description = "The Thinky Game",
                    Products = new Product[] {
                        new Product {
                            Name = "Thinking Cap",
                            Description = "Improve brain efficiency by 75%",
                            PurchasePrice = 10, RetailPrice = 16
                        },
                        new Product {
                            Name = "Unsteady Chair",
                            Description = "Secretly give your opponent a disadvantage",
                            PurchasePrice = 28, RetailPrice = 29.95m
                        },
                        new Product {
                            Name = "Human Chess Board",
                            Description = "A fun game for the family",
                            PurchasePrice = 68.50m, RetailPrice = 75
                        },
                        new Product {
                            Name = "Bling-Bling King",
                            Description = "Gold-plated, diamond-studded King",
                            PurchasePrice = 800, RetailPrice = 1200
                        }
                    }
                }
            });
            context.SaveChanges();
            return RedirectToAction(nameof(Index));
        }
    }
}
新的 action 方法创建一系列Category对象,并将Products导航属性设置为一个Product对象集合。所有对象都被传递给AddRange方法,并通过SaveChanges方法存储在数据库中。为了针对新的 action 方法,我将清单9-6中所示的元素添加到 Seed 控制器使用的 Index 视图中。
清单 9-6:Views/Seed 文件夹下的 Index.cshtml 文件,添加一个元素
@model IEnumerable<Product>

<h3 class="p-2 bg-primary text-white text-center">Seed Data</h3>

<form method="post">
    <div class="form-group">
        <label>Number of Objects to Create</label>
        <input class="form-control" name="count" value="50" />
    </div>

    <div class="text-center">
        <button type="submit" asp-action="CreateProductionData"
                class="btn btn-outline-primary">
            Production Seed
        </button>
        <button type="submit" asp-action="CreateSeedData" class="btn btn-primary">
            Seed Database
        </button>
        <button asp-action="ClearData" class="btn btn-danger">
            Clear Database
        </button>
    </div>
</form>

<h5 class="text-center m-2">
    There are @ViewBag.Count products in the database
</h5>

<div class="container-fluid">
    <div class="row">
        <div class="col-1 font-weight-bold">Id</div>
        <div class="col font-weight-bold">Name</div>
        <div class="col font-weight-bold">Category</div>
        <div class="col font-weight-bold text-right">Purchase</div>
        <div class="col font-weight-bold text-right">Retail</div>
    </div>
    @foreach (Product p in Model)
    {
        <div class="row">
            <div class="col-1">@p.Id</div>
            <div class="col">@p.Name</div>
            <div class="col">@p.Category.Name</div>
            <div class="col text-right">@p.PurchasePrice</div>
            <div class="col text-right">@p.RetailPrice</div>
        </div>
    }
</div>
button元素发送一个 HTTP POST 请求,它将具有清除数据库并将其与标准的运动商店产品和类别相结合的效果。
为准备本章数据库,请在 SportsStore 项目文件夹中运行清单9-7中所示的命令。这些命令添加了一个新的迁移,它反映了对数据模型的更改,然后删除并重新创建数据库。
清单 9-7:准备数据库
dotnet ef migrations add Customer
dotnet ef database drop --force
dotnet ef database update
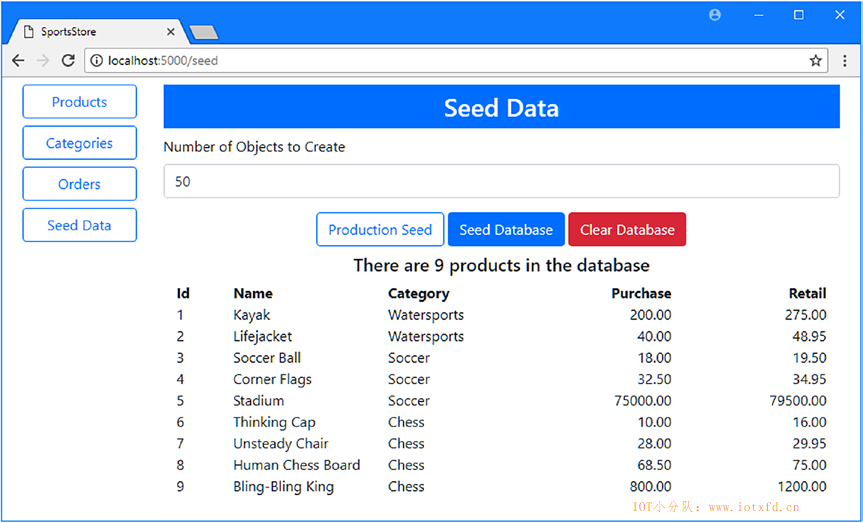
使用dotnet run启动应用程序,并导航至 http://localhost:5000,单击【Seed Data】按钮,然后单击【Production Seed】按钮。产品和类别将被添加到数据库并显示,如图9-1所示。
在下面的部分中,我添加了向用户显示产品列表所需的支持,允许它们按类别进行筛选,并在可购买的产品中分页。为此,我将在前面几章中添加的功能的基础上进行构建。
为了启动面向客户的应用程序部分,我添加了按产品类别查询Product对象的功能,从存储库接口开始,如清单9-8所示。
清单 9-8:Models 文件夹下的 IRepository.cs 文件,查询类别
using System.Collections.Generic;
using SportsStore.Models.Pages;

namespace SportsStore.Models
{
    public interface IRepository
    {
        IEnumerable<Product> Products { get; }
        PagedList<Product> GetProducts(QueryOptions options, long category = 0);
        Product GetProduct(long key);
        void AddProduct(Product product);
        void UpdateProduct(Product product);
        void UpdateAll(Product[] products);
        void Delete(Product product);
    }
}
在清单9-9中,我在实现类中进行了相应的更改,使用 LINQ Where方法根据将Product与其Category关联的外键属性进行查询。
清单 9-9:Models 文件夹下的 DataRepository.cs 文件,通过类别进行查询
using System.Collections.Generic;
using System.Linq;
using Microsoft.EntityFrameworkCore;
using SportsStore.Models.Pages;

namespace SportsStore.Models
{
    public class DataRepository : IRepository
    {
        private DataContext context;
        public DataRepository(DataContext ctx) => context = ctx;
        public IEnumerable<Product> Products => context.Products
            .Include(p => p.Category).ToArray();

        public PagedList<Product> GetProducts(QueryOptions options,
            long category = 0)
        {
            IQueryable<Product> query = context.Products.Include(p => p.Category);
            if (category != -0)
            {
                query = query.Where(p => p.CategoryId == category);
            }
            return new PagedList<Product>(query, options);
        }

        // ...其它省略...
    }
}
IQueryable<T>接口允许我根据方法参数组合查询,创建一个仅在枚举数据库时才会查询的对象。这是使用IQueryable<T>对象的优点,尽管缺点是容易意外触发重复查询。
为了提供将数据呈现给客户的控制器,我在 Controllers 文件夹中添加了一个名为 StoreController.cs 的文件,并添加了清单9-10中所示的代码。
清单 9-10:Controllers 文件夹下的 StoreController.cs 文件的内容
using Microsoft.AspNetCore.Mvc;
using SportsStore.Models;
using SportsStore.Models.Pages;

namespace SportsStore.Controllers
{
    public class StoreController : Controller
    {
        private IRepository productRepository;
        private ICategoryRepository categoryRepository;

        public StoreController(IRepository prepo, ICategoryRepository catRepo)
        {
            productRepository = prepo;
            categoryRepository = catRepo;
        }

        public IActionResult Index([FromQuery(Name = "options")]
            QueryOptions productOptions,
            QueryOptions catOptions,
            long category)
        {
            ViewBag.Categories = categoryRepository.GetCategories(catOptions);
            ViewBag.SelectedCategory = category;
            return View(productRepository.GetProducts(productOptions, category));
        }
    }
}
我使用了两个 QueryOptions 对象来管理Product和Category数据的显示。它们用于获取PagedList<Product>对象,该对象作为其模型传递给视图,而PagedList<Category>对象则添加到ViewBag中。
要为面向客户的功能提供布局,我创建了 Views/Store 文件夹,并在其中添加了一个名为 _Layout.cshtml 的文件,内容如清单9-11所示。
清单 9-11:Views/Store 文件夹下的 _Layout.cshtml 文件的内容
<!DOCTYPE html>
<html>
<head>
    <meta name="viewport" content="width=device-width" />
    <link rel="stylesheet" href="~/lib/twitter-bootstrap/css/bootstrap.min.css" />
    <title>SportsStore</title>
</head>
<body>
    <div class="container-fluid">
        <div class="row bg-dark p-4 text-white">
            <div class="col-auto"><h4>SPORTS STORE</h4></div>
            <div class="col"></div>
            <div class="col-auto text-right">
                (Cart Goes Here)
            </div>
        </div>
    </div>
    @RenderBody()
</body>
</html>
这个布局显示了我在大部分书中使用的标准的 SportsStore 标题,还有一个占位符,用于汇总客户的购物车,稍后我将把这个占位符添加到应用程序中。为了显示产品列表,我在 Views/Store 文件夹中添加了一个名为 Index.cshtml 的文件,内容如清单9-12所示。
清单 9-12:Views/Store 文件夹下的 Index.cshtml 文件的内容
@model PagedList<Product>
<div class="container-fluid">
    <div class="row no-gutters">
        <div class="col-auto">
            @await Html.PartialAsync("Categories", ViewBag.Categories as PagedList<Category>)
        </div>
        <div class="col">
            <div class="container-fluid">
                <div class="row pt-4 pb-1">
                    <div class="col text-center">
                        @await Html.PartialAsync("Pages", Model)
                    </div>
                </div>
                <div class="row pt-1 pb-1">
                    <div class="col"></div>
                    <div class="col-6 text-center form-group">
                        <input form="pageform" type="hidden"
                               name="options.searchpropertyname" value="Name" />
                        <input form="pageform" name="options.searchterm"
                               placeholder="Seach..." class="form-control" />
                    </div>
                    <div class="col">
                        <button form="pageform" class="btn btn-secondary"
                                type="submit">
                            Search
                        </button>
                    </div>
                    <div class="col"></div>
                </div>
                @foreach (Product p in Model)
                {
                    <div class="row">
                        <div class="col">
                            <div class="card m-1 p-1 bg-light">
                                <div class="bg-faded p-1">
                                    <h4>
                                        @p.Name
                                        <span class="badge badge-pill badge-primary"
                                              style="float:right">
                                            <small>$@p.RetailPrice</small>
                                        </span>
                                    </h4>
                                </div>
                                <form id="@p.Id" asp-action="AddToCart"
                                      asp-controller="Cart" method="post">
                                    <input type="hidden" name="Id" value="@p.Id" />
                                    <input type="hidden" name="Name"
                                           value="@p.Name" />
                                    <input type="hidden" name="RetailPrice"
                                           value="@p.RetailPrice" />
                                    <input type="hidden" name="returnUrl" value="@ViewContext.HttpContext.Request.PathAndQuery()" />
                                    <span class="card-text p-1">
                                        @(p.Description
                                            ?? "(No Description Available)")
                                        <button type="submit"
                                                class="btn btn-success btn-sm pull-right"
                                                style="float:right">
                                            Add To Cart
                                        </button>
                                    </span>
                                </form>
                            </div>
                        </div>
                    </div>
                }
            </div>
        </div>
    </div>
</div>
此视图集合了许多显示产品的功能,包括分页和搜索支持。为了向用户显示类别列表,我在 Views/Store 文件夹中添加了一个名为 Categories.cshtml 的文件,内容如清单9-13所示。
清单 9-13:Views/Store 文件夹下的 Categories.cshtml 文件的内容
@model PagedList<Category>
<div class="container-fluid mt-4">
    <div class="row no-gutters">
        <div class="col mt-1">
            <button form="pageform" name="category" value="0" type="submit"
                    class="btn btn-block @(ViewBag.SelectedCategory == 0
                        ? "btn-primary" : "btn-outline-primary")">
                All
            </button>
        </div>
    </div>
    <div class="row no-gutters mt-4"></div>
    <div class="row no-gutters">
        <div class="col mt-1">
            <button form="pageform"
                    name="catoptions.currentPage" value="@(Model.CurrentPage -1)"
                    class="btn btn-block btn-outline-secondary
                        @(!Model.HasPreviousPage ? "disabled" : "")"
                    type="submit">
                Previous
            </button>
        </div>
    </div>
    @foreach (Category c in Model)
    {
        <div class="row no-gutters">
            <div class="col mt-1">
                <button form="pageform" name="category" value="@c.Id"
                        type="submit"
                        class="btn btn-block @(ViewBag.SelectedCategory == c.Id
                            ? "btn-primary" : "btn-outline-primary")">
                    @c.Name
                </button>
            </div>
        </div>
    }
    <div class="row no-gutters">
        <div class="col mt-1">
            <button form="pageform"
                    name="catoptions.currentPage" value="@(Model.CurrentPage +1)"
                    class="btn btn-block btn-outline-secondary
                        @(!Model.HasNextPage? "disabled" : "")"
                    type="submit">
                Next
            </button>
        </div>
    </div>
</div>
此视图列出可用的类别,并提供要在列表中页的【Previous】按钮和【Next】按钮。选择类别的button元素使用名为pagesform的 HTML 表单以所选类别的主键值为目标。
在用户选择了产品之后,我需要知道导航回哪个 URL,并且为了简化处理,我创建了 Infrastructure 文件夹,并向它添加了一个名为 UrlExtensions.cs 的类文件,代码如清单9-14所示。
清单 9-14:Infrastructure 文件夹下的 UrlExtensions.cs 文件的内容
using Microsoft.AspNetCore.Http;

namespace SportsStore.Infrastructure
{
    public static class UrlExtensions
    {
        public static string PathAndQuery(this HttpRequest request) =>
        request.QueryString.HasValue
            ? $"{request.Path}{request.QueryString}"
            : request.Path.ToString();
    }
}
这个类定义了我在清单9-13中的form元素中使用的PathAndQuery扩展方法。为了在视图中启用扩展方法,我将清单9-15所示的语句添加到视图导入文件中。
清单 9-15:Views 文件夹下的 _ViewImports.cshtml 文件,添加命名空间
@using SportsStore.Models
@using SportsStore.Models.Pages
@using SportsStore.Infrastructure
@addTagHelper *, Microsoft.AspNetCore.Mvc.TagHelpers
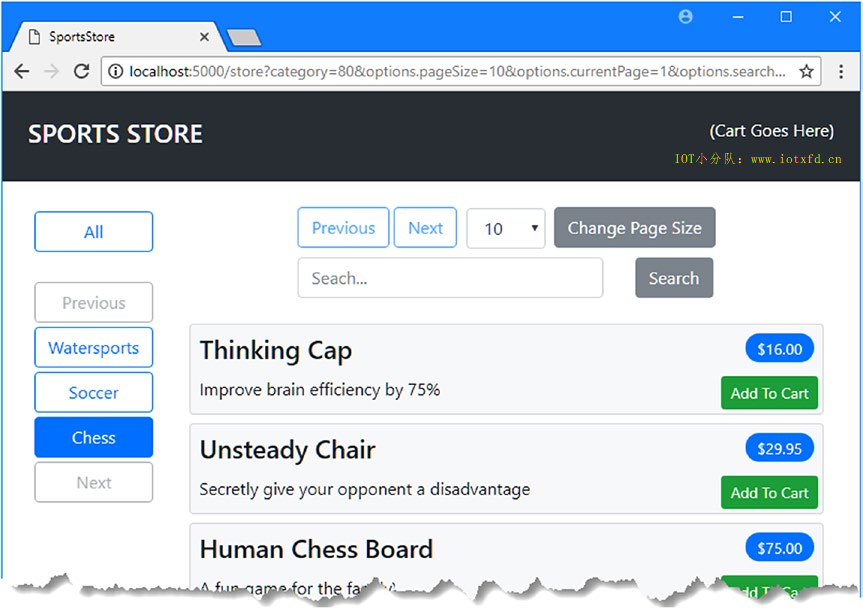
要查看更改的效果,请使用dotnet run启动应用程序,然后导航到 http://localhost:5000/store。您将看到产品列表,可以按类别进行筛选,如图9-2所示。
提示:您可以看到显示是如何通过导航到 http://localhost:5000/seed 并生成测试数据来处理更大数量的数据的。
下一步是添加对选择产品并将其存储在购物车中的支持,然后可以使用购物车完成订单。在接下来的部分中,我将应用程序配置为存储会话数据,并将其用作产品选择的临时存储。
完成 SportsStore 应用程序所需的一些功能需要跨 HTTP 请求存储数据,我将 ASP.NET Core 会话数据特性配置为使用 Entity Framework Core 存储数据。为了添加配置会话数据库所需的包,我右键单击了【解决方案资源管理器】中的【SportsStore】项,从弹出菜单中选择了【SportsStore.csproj】,并进行了清单9-16所示的更改。
译者注:.NET 2.1 及之后的版本默认已经安装了此工具,可以跳过此步骤。此处为原文的针对 .NET 2.0 版本的内容
清单 9-16:SportsStore 文件夹下的 SportsStore.csproj 文件,添加程序包
<Project Sdk="Microsoft.NET.Sdk.Web">

    <PropertyGroup>
        <TargetFramework>netcoreapp2.0</TargetFramework>
    </PropertyGroup>

    <ItemGroup>
        <Folder Include="wwwroot\" />
    </ItemGroup>

    <ItemGroup>
        <PackageReference Include="Microsoft.AspNetCore.All" Version="2.0.3" />
        <DotNetCliToolReference Include="Microsoft.EntityFrameworkCore.Tools.DotNet" Version="2.0.0" />
        <DotNetCliToolReference Include="Microsoft.Extensions.Caching.SqlConfig.Tools" Version="2.0.0" />
    </ItemGroup>

</Project>
保存更改, Visual Studio 将下载并安装新程序包。打开一个新的命令提示符,并运行清单9-17所示的命令,在 SportsStore 项目文件夹中创建会话数据库。
警告:您可能会尝试创建自己的会话数据功能,但不要低估所需的工作量,特别是要确保定期从数据库中清除过期会话。我的建议是利用您的时间和技能为您的应用程序创建功能,而不是重新发明微软已经提供的东西。
清单 9-17:创建会话数据库
dotnet sql-cache create "Server=(localdb)\MSSQLLocalDB;Database=SportsStore" "dbo" "SessionData"
dotnet sql-cache create命令准备会话数据库,但由于它不从 appsettings.json 文件读取其配置,因此使用起来很麻烦,这意味着必须仔细键入参数。第一个参数是数据库的连接字符串,第二个参数是架构名称(默认情况下是dbo),最后一个参数是将添加到数据库中的表的名称,我指定为SessionData。
为在数据库中启用会话,我在Startup类中添加了如清单9-18所示的语句**
清单 9-18:SportsStore 文件夹下的 Startup.cs 文件,启用会话
using System.Threading.Tasks;
using Microsoft.AspNetCore.Builder;
using Microsoft.AspNetCore.Hosting;
using Microsoft.Extensions.DependencyInjection;
using SportsStore.Models;
using Microsoft.EntityFrameworkCore;
using Microsoft.Extensions.Configuration;

namespace SportsStore
{
    public class Startup
    {
        public Startup(IConfiguration config) => Configuration = config;

        public IConfiguration Configuration { get; }

        public void ConfigureServices(IServiceCollection services)
        {
            services.AddMvc();
            services.AddTransient<IRepository, DataRepository>();
            services.AddTransient<ICategoryRepository, CategoryRepository>();
            services.AddTransient<IOrdersRepository, OrdersRepository>();
            string conString = Configuration["ConnectionStrings:DefaultConnection"];
            services.AddDbContext<DataContext>(options =>
                options.UseSqlServer(conString));

            services.AddDistributedSqlServerCache(options => {
                options.ConnectionString = conString;
                options.SchemaName = "dbo";
                options.TableName = "SessionData";
            });
            services.AddSession(options => {
                options.Cookie.Name = "SportsStore.Session";
                options.IdleTimeout = System.TimeSpan.FromHours(48);
                options.Cookie.HttpOnly = false;
            });
        }

        public void Configure(IApplicationBuilder app, IHostingEnvironment env)
        {
            app.UseDeveloperExceptionPage();
            app.UseStatusCodePages();
            app.UseStaticFiles();
            app.UseSession();
            app.UseMvcWithDefaultRoute();
        }
    }
}
会话功能只存储字符串值。为了使这个功能更容易使用,我在 Infrastructure 文件夹中添加了一个名为 SessionExtensions.cs 的文件,并添加了清单9-19所示的代码。
清单 9-19:Infrastructure 文件夹下的 SessionExtensions.cs 文件的内容
using Microsoft.AspNetCore.Http;
using Newtonsoft.Json;

namespace SportsStore.Infrastructure
{
    public static class SessionExtensions {
        public static void SetJson(this ISession session, string key, object value)
        {
            session.SetString(key, JsonConvert.SerializeObject(value));
        }
        public static T GetJson<T>(this ISession session, string key)
        {
            var sessionData = session.GetString(key);
            return sessionData == null
                ? default(T) : JsonConvert.DeserializeObject<T>(sessionData);
        }
    }
}
该类定义扩展方法,将对象序列化为 JSON 格式,并再次还原它们,允许我轻松地将简单对象存储为会话数据。
为了表示客户的产品选择,我在 Models 文件夹中添加了一个名为 Cart.cs 的文件,并使用它来定义清单9-20所示的类。
清单 9-20:Models 文件夹下的 Cart.cs 文件的内容
using System.Collections.Generic;
using System.Linq;

namespace SportsStore.Models
{
    public class Cart
    {
        private List<OrderLine> selections = new List<OrderLine>();

        public Cart AddItem(Product p, int quantity)
        {
            OrderLine line = selections
                .Where(l => l.ProductId == p.Id).FirstOrDefault();
            if (line != null)
            {
                line.Quantity += quantity;
            }
            else
            {
                selections.Add(new OrderLine
                {
                    ProductId = p.Id,
                    Product = p,
                    Quantity = quantity
                });
            }
            return this;
        }
        public Cart RemoveItem(long productId)
        {
            selections.RemoveAll(l => l.ProductId == productId);
            return this;
        }

        public void Clear() => selections.Clear();
        public IEnumerable<OrderLine> Selections { get => selections; }
    }
}
Cart类管理OrderLine对象的集合,这些对象表示单个产品选择,在创建订单时可以轻松地存储在数据库中。
为了提供对使用Cart对象逻辑的支持,我在 Controllers 文件夹中添加了一个名为 CartController.cs 的文件,代码如清单9-21所示。
清单 9-21:Controllers 文件夹下的 CartController.cs 文件的内容
using Microsoft.AspNetCore.Mvc;
using SportsStore.Models;
using SportsStore.Infrastructure;
using Microsoft.AspNetCore.Mvc.ViewComponents;
using Microsoft.AspNetCore.Mvc.ViewFeatures;
using Microsoft.AspNetCore.Http;
using System.Linq;

namespace SportsStore.Controllers
{
    [ViewComponent(Name = "Cart")]
    public class CartController : Controller
    {
        private IRepository productRepository;
        private IOrdersRepository ordersRepository;

        public CartController(IRepository prepo, IOrdersRepository orepo)
        {
            productRepository = prepo;
            ordersRepository = orepo;
        }

        public IActionResult Index(string returnUrl)
        {
            ViewBag.returnUrl = returnUrl;
            return View(GetCart());
        }

        [HttpPost]
        public IActionResult AddToCart(Product product, string returnUrl)
        {
            SaveCart(GetCart().AddItem(product, 1));
            return RedirectToAction(nameof(Index), new { returnUrl });
        }

        [HttpPost]
        public IActionResult RemoveFromCart(long productId, string returnUrl)
        {
            SaveCart(GetCart().RemoveItem(productId));
            return RedirectToAction(nameof(Index), new { returnUrl });
        }

        public IActionResult CreateOrder()
        {
            return View();
        }

        [HttpPost]
        public IActionResult CreateOrder(Order order)
        {
            order.Lines = GetCart().Selections.Select(s => new OrderLine
            {
                ProductId = s.ProductId,
                Quantity = s.Quantity
            }).ToArray();
            ordersRepository.AddOrder(order);
            SaveCart(new Cart());
            return RedirectToAction(nameof(Completed));
        }

        public IActionResult Completed() => View();
        private Cart GetCart() =>
            HttpContext.Session.GetJson<Cart>("Cart") ?? new Cart();
        private void SaveCart(Cart cart) =>
            HttpContext.Session.SetJson("Cart", cart);

        public IViewComponentResult Invoke(ISession session)
        {
            return new ViewViewComponentResult()
            {
                ViewData = new ViewDataDictionary<Cart>(ViewData,
                    session.GetJson<Cart>("Cart"))
            };
        }
    }
}
控制器定义从购物车中添加和删除项目的 action,显示购物车的内容,并允许客户创建订单。其中一些方法接受returnUrl参数,该参数允许用户返回产品列表,而不会丢失配置分页和类别筛选选项的查询字符串参数。这个类也是一个视图组件,我将使用它在面向客户的布局中显示购物车的摘要。
为了为新控制器提供一个用于管理购物车的视图,我创建了Views/Cart文件夹,并向它添加了一个名为index.cshtml的文件,内容如清单9-22所示。
清单 9-22:Views/Cart 文件夹下的 Index.cshtml 文件的内容
@model Cart
@{
    Layout = "~/Views/Store/_Layout.cshtml";
}
<h2 class="m-3">Your Cart</h2>

<div class="container-fluid">
    <div class="row">
        <div class="col font-weight-bold">Quantity</div>
        <div class="col font-weight-bold">Product</div>
        <div class="col font-weight-bold text-right">Price</div>
        <div class="col font-weight-bold text-right">Subtotal</div>
        <div class="col"></div>
    </div>
    @if (Model.Selections.Count() == 0)
    {
        <div class="row mt-2"><div class="col-12"><h4>Cart is Empty</h4></div></div>
    }
    else
    {
        @foreach (OrderLine line in Model.Selections)
        {
            <div class="row mt-1">
                <div class="col">@line.Quantity</div>
                <div class="col">@line.Product.Name</div>
                <div class="col text-right">
                    $@line.Product.RetailPrice.ToString("f2")
                </div>
                <div class="col text-right">
                    $@((line.Product.RetailPrice
                               * line.Quantity).ToString("f2"))
                </div>
                <div class="col">
                    <form asp-action="RemoveFromCart">
                        <button type="submit" name="productId"
                                value="@line.ProductId"
                                class="btn btn-sm btn-outline-danger">
                            Remove
                        </button>
                    </form>
                </div>
            </div>
        }
    }
    <div class="row mt-2">
        <div class="col"></div>
        <div class="col"></div>
        <div class="col text-right font-weight-bold">Total:</div>
        <div class="col text-right font-weight-bold">
            $@(Model.Selections.Sum(l => l.Product.RetailPrice
                       * l.Quantity).ToString("f2"))
        </div>
        <div class="col"></div>
    </div>
</div>
<div class="text-center m-2">
    @if (ViewBag.returnUrl != null)
    {
        <a href="@ViewBag.returnUrl" class="btn btn-outline-primary">
            Continue Shopping
        </a>
    }
    <a asp-action="CreateOrder" class="btn btn-primary">
        Place Order
    </a>
</div>
该视图显示客户选择的摘要,并提供返回产品列表或继续创建订单的按钮。为了收集创建订单所需的信息,我将一个名为 CreateOrder.cshtml 的文件添加到 Views/Cart 文件夹中,其内容如清单9-23所示。
清单 9-23:Views/Cart 文件夹下的 CreateOrder.cshtml 文件的内容
@model Order
@{
    Layout = "~/Views/Store/_Layout.cshtml";
}

<h2 class="m-3">Your Details</h2>

<form asp-action="CreateOrder" method="post" class="m-4">
    <div class="form-group">
        <label>Your Name:</label>
        <input asp-for="CustomerName" class="form-control" />
    </div>
    <div class="form-group">
        <label> Your Address</label>
        <input asp-for="Address" class="form-control" />
    </div>
    <div class="form-group">
        <label>Your State:</label>
        <input asp-for="State" class="form-control" />
    </div>
    <div class="form-group">
        <label>Your Zip Code:</label>
        <input asp-for="ZipCode" class="form-control" />
    </div>
    <div class="text-center m-2">
        <button type="submit" class="btn btn-primary">Place Order</button>
        <a asp-action="Index" class="btn btn-secondary">Cancel</a>
    </div>
</form>
为了在创建订单后向用户显示一条消息,我在 Views/Cart 文件夹中添加了一个名为 Completed.cshtml 的文件,内容如清单9-24所示。
清单 9-24:Views/Cart 文件夹下的 Completed.cshtml 文件的内容
@{
    Layout = "~/Views/Store/_Layout.cshtml";
}

<div class="text-center m-4">
    <h2>Thanks!</h2>
    <p>Thanks for placing your order.</p>
    <p>We'll ship your goods as soon as possible.</p>
    <a asp-action="Index" asp-controller="Store"
            class="btn btn-primary">
        OK
    </a>
</div>
为购物车摘要小部件创建视图,我创建了 Views/Shared/Components/Cart 文件夹,并向其添加了一个名为 Default.cshtml 的文件,内容如清单9-25所示。
清单 9-25:Views/Shared/Components/Cart 文件夹下的 Default.cshtml 文件的内容
@model Cart

@if (Model?.Selections?.Count() > 0)
{
    <div>
        @Model.Selections.Count() items,
        $@(Model.Selections.Sum(l => l.Quantity
              * l.Product.RetailPrice).ToString("f2"))
    </div>
    if (ViewContext.RouteData.Values["controller"] as string != "Cart")
    {
        <a asp-action="Index" asp-controller="Cart"
                class="btn btn-sm btn-light">
            Checkout
        </a>
    }
}
此视图显示购物车中的项目数及其总成本。如果 Cart 控制器不是渲染视图的控制器,也有一个按钮可以导航到 Cart 控制器。为了显示购物车小部件,我使用了Component.InvokeAsync方法将视图组件添加到用于存储功能的布局中,如清单9-26所示。
清单 9-26:View/Store 文件夹下的 _Layout.cshtml 文件,添加一个元素
<!DOCTYPE html>
<html>
<head>
    <meta name="viewport" content="width=device-width" />
    <link rel="stylesheet" href="~/lib/twitter-bootstrap/css/bootstrap.min.css" />
    <title>SportsStore</title>
</head>
<body>
    <div class="container-fluid">
        <div class="row bg-dark p-4 text-white">
            <div class="col-auto"><h4>SPORTS STORE</h4></div>
            <div class="col"></div>
            <div class="col-auto text-right">
                @await Component.InvokeAsync("Cart", Context.Session)
            </div>
        </div>
    </div>
    @RenderBody()
</body>
</html>
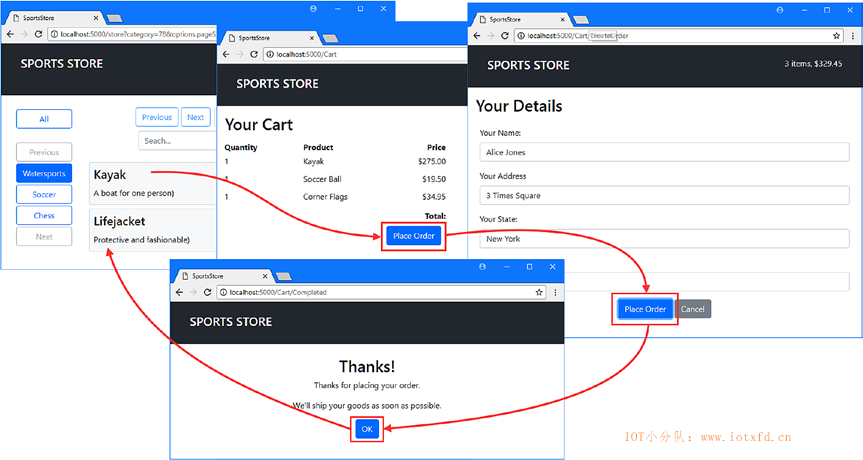
为测试订单过程,使用dotnet run启动应用程序,并导航至 http://localhost:5000/store。单击一个或多个产品的【Add to Cart】按钮,然后单击【Place Orde】按钮。输入客户详细信息并单击【Place Order】按钮;您将看到完成消息。图9-3显示了顺序。
本章主要是关于使用 MVC 构建应用程序功能,并且很少出现可能导致 Entity Framework Core 问题。
例如,假设您单击按钮以改变Categories的页面,但发现改变的是Product页面,那么可能的原因是视图中的 HTML 表单更新了错误的PageOptions对象。密切注意 action 方法中参数的名称,并确保在 HTML 元素的name属性中使用这些名称作为前缀。如果有疑问,请使用浏览器的F12开发工具查看要发送给应用程序的表单值。
没有效果的按钮最常见的原因是省略了form属性,该属性用于将 HTML 元素与表单关联起来。这是 HTML5 的一个特性,但经常会引起混淆,因为开发人员不习惯将表单扩展到其 form 元素之外。
这是我前面描述过的一个异常,但是值得再次注意,因为它经常发生。在本章的上下文中,可能的原因是查询了数据库中的对象,然后将它们存储为会话数据,就像我对与OrderLine关联的Product对象所做的那样。您所查询的对象已经具有主键,并引发异常,因为 Entity Framework Core 试图将它们作为新对象添加到数据库中。
随后从会话数据获取对象并将其存储在数据库中时,必须确保删除对先前查询的相关数据的引用。对于作为会话数据存储在Cart中,然后以Order存储在数据库中的OrderLine对象,我使用以下代码删除对Product对象的引用,并生成一组干净的OrderLine对象:
order.Lines = GetCart().Selections.Select(s => new OrderLine {
    ProductId = s.ProductId, Quantity = s.Quantity
}).ToArray();
...
如果看到的错误指示为:您期望通过会话数据访问的对象为null,那么您可能忘记使用清单9-17所示的命令创建会话数据库。
这很可能是由于将会话功能配置为将其数据存储在内存中而不是数据库中。内存中的会话存储可能会更快,但是当应用程序重新启动时数据就会丢失,如果您使用应用程序容器(如 Docker 容器),并且通过启动和停止容器来适应需求,这将特别有问题。
类似地,当MVC应用程序有多个实例运行时,使用内存中的会话存储可能导致会话数据不一致,而且您还没有配置网络以确保来自同一个客户端的 HTTP 请求始终由同一个 MVC 实例处理。如果遇到这些问题,请考虑将会话数据存储在数据库中,如本章所示。
在本章中,我通过添加面向客户的功能完成了 SportsStore 应用程序。我创建了一个产品列表,用户可以按类别浏览、搜索或筛选。选择的产品被添加到购物车中,然后购物车可以用来创建一个订单,该订单存储在数据库中。我在本章中添加的大多数功能都是在前面章节中创建的 Entity Framework Core 基础上使用 MVC 框架来构建的,这是一种比您在自己的项目中看到的更好的模式 —— 许多初始数据模型配置和代码,然后是一系列面向用户的特性,它们很快就到位了。在下一章中,我通过创建一个 RESTful API 来完成运动商店项目。
;